
Living donor is the one who is willing to give a part of his liver to the recipient. Good thing is liver is the only part of our body that can regenerate, therefore for a living donor he can regain full volume of the liver after around 12 week post the transplant surgery.
Quick criteria to act as living donor:
- The donor’s age should be between 18-55 years.
- The basic match for donor is he/she should have the same blood group as the recipient and
- Rest of the tests are to ensure he/she has a healthy liver, the person is fit and/or he/she doesn’t have any other disease or history of a past disease (like Jaundice) which could increase the risk for him or her as well as for recipient.
Note: For Patient above the age of 65, it’s recommended only close family should act as donor, “Close” here means siblings or his/her kids.
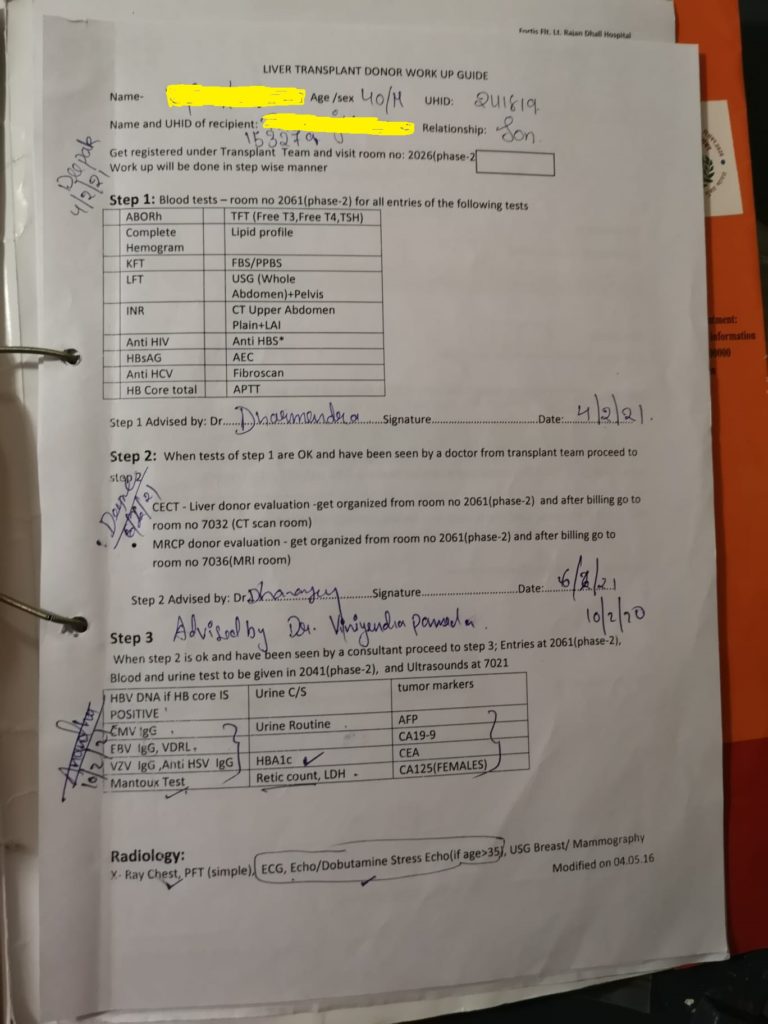
Donor Work Up Guide, As the name indicate, once you register as living donor you get the work-up guide which has all the list of tests that you need to take in three steps before you are given a green light to act as a living donor.
You have to pass each step before you can move to subsequent step.
At the end you will find a picture of the work-up guide. Below is the sequence in which they need to be done to complete the process with minimum fuss:
- Take a consultation (phase-2 OPD reception) with surgery team led by Dr. V. Pamecha (Phase-2 Building Section D) on a Wednesday.
- Upon consultation, they first check your BMI (Body Mass Index), ask about your drinking/smoking habits and if no red alert they give you your work-up guide as well as explain you the risk involved in this surgery.
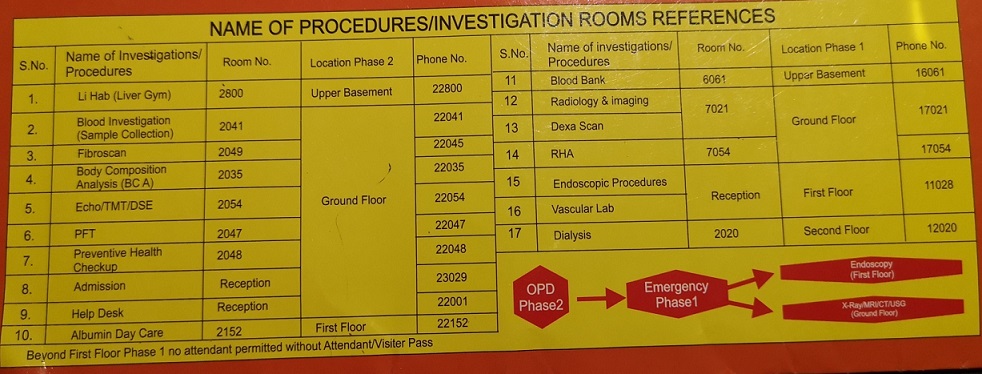
- Further, they write on the consultation paper to go ahead with step 1 tests and ask you to go to coordination dept., room 2061 in phase-2 building.
- Coordination dept. will do your data feed into the computer and can also explain and answer questions related to pre/post surgery process, the cost details etc. They will then sign and tick on the tests to be done against step 1.
- Post coordination department has signed, you need to go back to phase-2 OPD reception and show your signed work-up guide and ask for billing to be done for all the tests in step 1.
- Step 1 test requires you to come empty stomach and give your blood and urine sample. You need to go to window counter, room 2041 (phase-2 building), show your billing paper, get the token for your turn to provide the required samples.
- After providing the sample, you can have a meal and then wait for around 90-120 mins to go again to room 2041 to give the blood sample once more to test FBS/PPBS.
- You also need to get the A)- Fibroscan done from room 2049 in phase-2 building and B)- ultra sound and CT scan of your abdomen done from phase-1 building, radiology department on the ground floor.
- Results of the tests are usually available in next 12-24 hours and you can access them online as well via e-Yakrit app.
- Once the results for step 1 are available, you need to follow same steps i.e. take consultation with surgery team and show your results.
- At this point based on results of step 1 tests you could either A. Be rejected B. Be asked to take further tests before moving to step 2 OR C. Given a nod to go ahead with Step 2.
- Once given a go ahead to proceed with Step 2 tests by the surgery team, you need to go back to coordination dept. (Room 2061) get data punching done and their signature against step 2 tests. Post this you can get the billing done for tests against Step 2.
- Step 2 mainly requires CT scan and MRI scan to be done which is in phase-1 building Radiology Department. IMPORTANT: Please ask the radiologist to also prepare the volumetric report as part of CT Scan, this report is included in the amount billed for CT Scan but not produced unless explicitly asked. To move to step 3, the surgical team will need to check this report to ensure – 1st there is enough liver volume and 2nd if all good, how much, and which part they will need to take from your liver.
- Same procedure is followed post Step 2 results, you have to take consultation with the surgery team, show them the results and if all approved by them, go to coordination dept at room 2061 who will punch data and sign to be able to do billing for tests required in step 3.
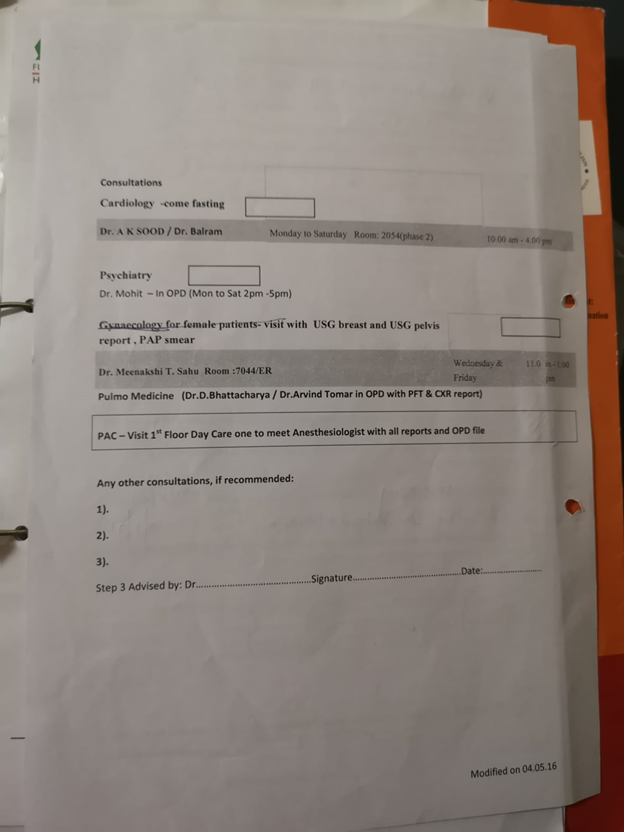
- Step 3 tests involves giving blood and urine samples ( Phase-2 building room 2041) on empty stomach, plus tests required to get approval from various specialists like pulmonary, cardiology etc.
- Typical tests involved by each category is below:
| Pulmonary | Cardiologist | Psychiatrist |
| PFT X-Ray Chest Mantoux Test Doctors at ILBS Dr. (Brig) D Bhattacharya ( One of the nice doctors to talk to 🙂 ) Dr. Arvind Tomar | ECG ECHO TMT OR DSE ( If you are a bit old to run on treadmill) Doctors at ILBS Dr. Balram Mishra ( One of the unpleasant guy to talk to 🙁 ) Dr A K Sood | No Test, just need to see Dr. Mohit or any other psychiatrist outside ILBS |
- Note: For Montoux test ( Phase-2 building room 2053), you are given an injection on the forearm and that area is circled. You are advised to not put soap or body wash on that area for 2 days. After 2 days you need to show it back to the nurse who will check if there’s been no reaction/swelling to write the report.
- IMPORTANT: Step 3 tests involve taking approval from pulmonary, cardiology and psychiatrist plus anyone else if indicated specifically based on your previous results. The way to proceed is get consultation with these respective doctors and they will suggest you the specific tests to give their approval. You should then get the billing done for those tests only.
- Once you have the clearance from the respective specialists as ticked in your work-up guide, you need to get Pre-anesthesia checkup (PAC) done in the phase-1 building on 1st floor. Based on this check-up, the anesthetist might ask for couple of additional tests to be done before giving clearance from his/her side for you to be considered ready for the surgery.
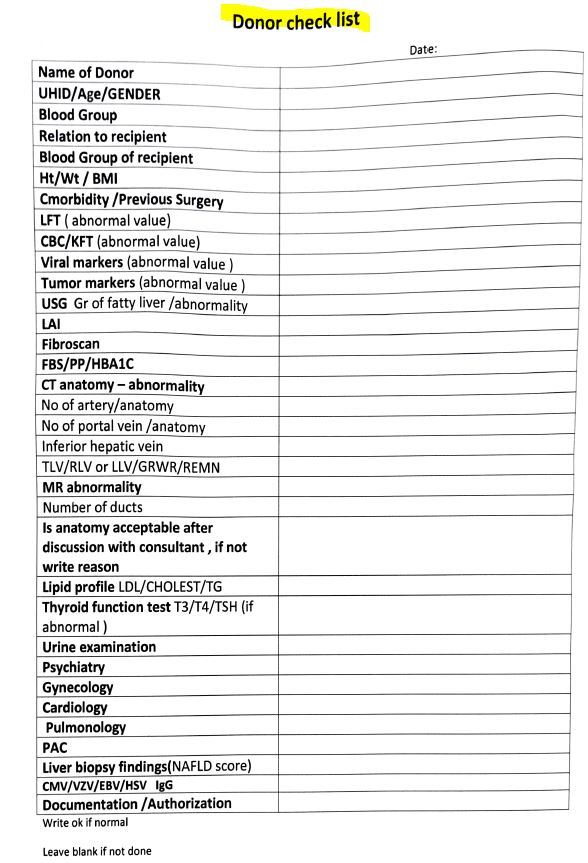
- Post approvals from other specialist as well as PAC clearance, you need to get the donor checklist (see picture below) from coordination department (Room 2061 phase-2), take consultation with surgery team to show the respective documents from Step 3 and get donor checklist filled and signed by the surgery team.
At this point you are now ready to start the process which includes legal paperwork required to get the surgery date from the surgical team, I will cover the required steps in a separate blog.
Thanks for the detailed info